Warning: Image intensive post, sorry!
After a lot (and I mean a lot) of scribbling, sketching, headaches and frustration I've come up with what I think is the best possible solution of the pelmet/backscene given the extremely awkward circumstances. To an outsider, it may seem like a lot of work, but I think it is my best option (and frankly I just want to get on with it now!). Firstly, I will show a construction step-by-step guide to show the different layers involved:


 Above: Next, the thin ply top is screwed and glued onto the subframe. (You can see how the pelmet on the right rest on this ply now) You can also see 5 (if you look closely, it's hard to tell!) blocks which are the locators for the backscene. These are embedded into the polystyrene and glued/screwed to the thin ply. Also in this shot, the bottom fascia can be seen permanently attached to the subframe. Note the two blocks on the right are actually in the fiddle yard as there is no room on the scenic area for them (the ground level is too low in this corner).
 Above: And here are the existing polystyrene landforms (I didn't bother modelling the trackbed, nor the holes for the point motors). The blocks shown above can be seen more clearly now, but these won't actually be visible - they are actually modelled taller for clarity. In reality they are about 1cm lower than the top of the polystyrene so will be in fact covered by it.
 Above: The final stage is the backscene. This is simply slotted into the gap between fiddle yard and scenic area. The blocks guide it into place, and the only place where it will be secured will probably be onto the sub-board on the bottom left. We'll see though. Note: no lighting has been shown.
Below: An exploded view showing all the relevant parts! It's not as complex as I just made it out to be, and I think that exploded view will give you a better idea of what slots into where.

A few detail shots:
 Above: This is the rear view showing the hinges on the pelmet stand. You can see how the backscene rests against the pelmet supports (it also does this on the far right post, out of shot). This view also shows how the thin ply base no longer juts out and is hidden by the fascia - the turntable should be strong enough to hold it's own shape so it won't need the added support. It also makes the woodwork that little bit easier (and neater) when it comes to adding the fascia.
Below: A close up of the lighting pelmet fascia arrangement. This simply hooks onto the pelmet support - simple!

Well, that was a long post but I'm glad I've finally worked it out! Construction may have to wait until the weekend though.
Any questions, fire away!
After a lot (and I mean a lot) of scribbling, sketching, headaches and frustration I've come up with what I think is the best possible solution of the pelmet/backscene given the extremely awkward circumstances. To an outsider, it may seem like a lot of work, but I think it is my best option (and frankly I just want to get on with it now!). Firstly, I will show a construction step-by-step guide to show the different layers involved:

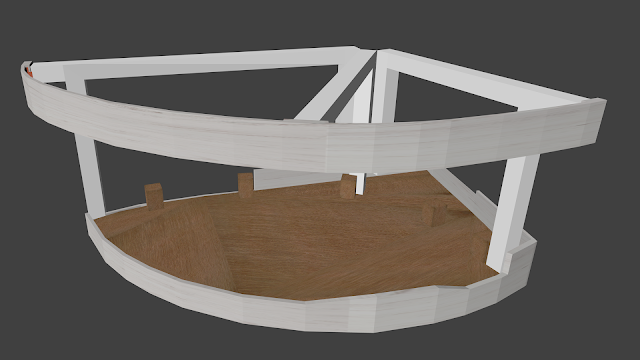
Above: This is the design for the subframe (which will sit underneath the current layer of thin ply on the layout). You'll note that at the back there is considerably more bracing. This is why...

Above: ... the pelmet support will be located here! It's hard to tell from this angle, but on the far left, that post extends down to the bottom of the subframe (it will be bolted onto it when in use). The right-most post will sit on the subframe (actually, onto the thin ply top shown in the next image). The three pelmet arms are hinged, and the fascia is simply lifted off for storage.


Below: An exploded view showing all the relevant parts! It's not as complex as I just made it out to be, and I think that exploded view will give you a better idea of what slots into where.

A few detail shots:

Below: A close up of the lighting pelmet fascia arrangement. This simply hooks onto the pelmet support - simple!

Well, that was a long post but I'm glad I've finally worked it out! Construction may have to wait until the weekend though.
Any questions, fire away!
Comments
Post a Comment