So, the time has come! I've decided to brave it and construct the vital part of the trackplan - the crossing! I have been both looking forward to this bit, and also not for obvious reasons. This will be a bit photo intensive, but I'm sure you won't mind. I'll warn you now - my soldering skills are terrible so it will not be neat...

Above: The first step - the copper clad board was cut out and the middle position of the tracks marked onto it.
Below: The copper was then cut carefully using a Dremel cutter bit along the lines.


Above: I decided the best way to do it was to cut out some sleepers off of an existing bit of track.
Below: The ends of the first rail were spot soldered on each end.


Above and below: The same bit of rail was then soldered along its entire length. The second reference rail was then chamfered and the bottom edge notched to accept the web of the other rail. This was again spot soldered and then fully soldered once happy with its position.


Above and below: The second bit of rail was then continued onto the other side, and so on and so forth. The plastic sleepers meant one end was always the right gauge and I then only had to pay attention to the other end. Luckily the heat of the iron didn't melt the sleepers.


Above: Then it came to fitting the tiny length of rail (next to the white bit of plasticard). I decided as you can see to use the plasticard to hold the rail in place from one side. Only having two hands makes things really hard, so sometimes you have to think up different ways of doing things.
Below: And here it is in place (nearest the camera). I thought this was hard to do - you wait till I got to the check/wing rails!


Above: The wing/check rails were cut to length and angled (using a pair of pliers to hold whilst bending the rail. Why I didn't make them all regular lengths I've no idea! These rails were all angled and notched of course.
Below: Soldering these rails on was a complete pain in the proverbial. It didn't help that the soldering iron bit was dirty and I don't have anything to clean it with. They say it's very important to keep it clean, and I can see why now! Anyway, here is the finished (almost) crossing on the layout. All that is left to do is cut the flange gaps and isolating gaps and wire it up.


Above and below: I can see a lot of excess solder which could do with being cleaned up! I am very happy with it so far and it seems to be all working as far as gauge is concerned which is promising. It certainly isn't neat by any stretch, but it is my first bit of hand made track and I'm really happy with it all things considered. I have added a ruler on the bottom photo to give some scale to the photos.

So that's about it for now, I'm really hoping this will work as intended when I've wired it up and cut the gaps!

Above: The first step - the copper clad board was cut out and the middle position of the tracks marked onto it.
Below: The copper was then cut carefully using a Dremel cutter bit along the lines.


Above: I decided the best way to do it was to cut out some sleepers off of an existing bit of track.
Below: The ends of the first rail were spot soldered on each end.


Above and below: The same bit of rail was then soldered along its entire length. The second reference rail was then chamfered and the bottom edge notched to accept the web of the other rail. This was again spot soldered and then fully soldered once happy with its position.


Above and below: The second bit of rail was then continued onto the other side, and so on and so forth. The plastic sleepers meant one end was always the right gauge and I then only had to pay attention to the other end. Luckily the heat of the iron didn't melt the sleepers.

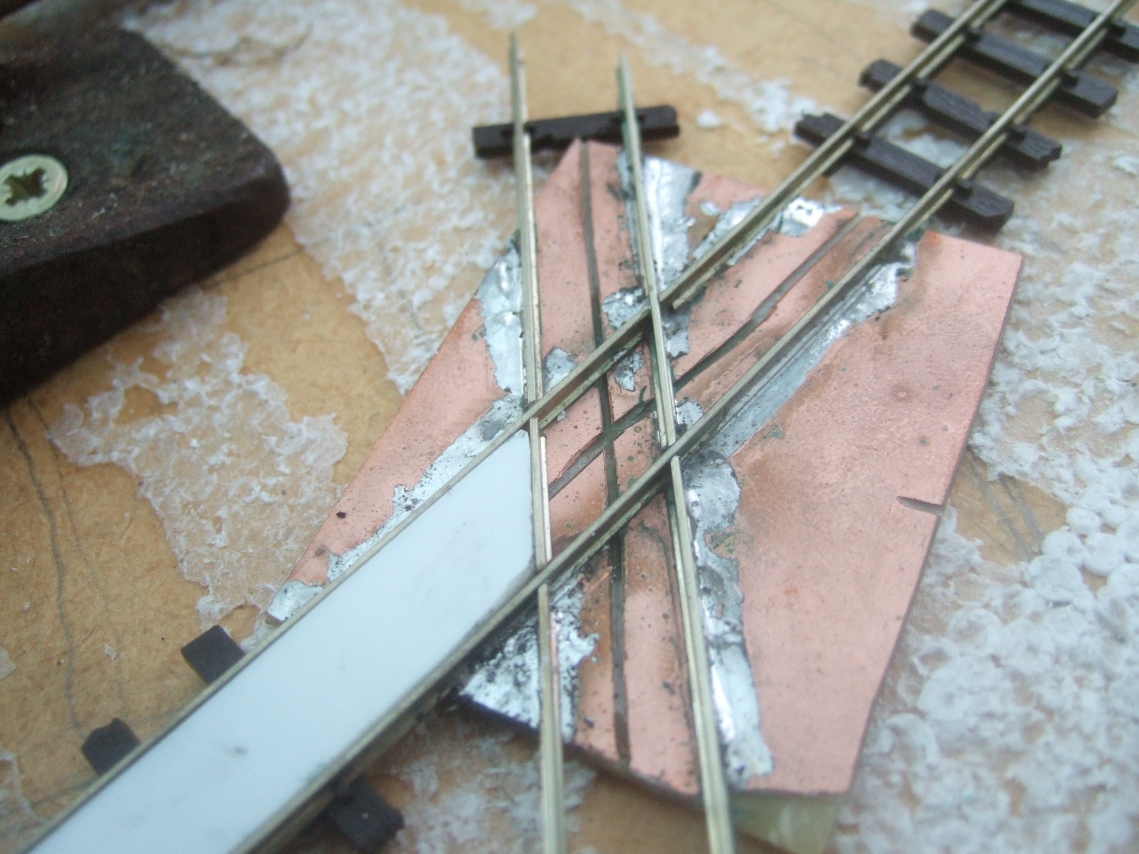
Above: Then it came to fitting the tiny length of rail (next to the white bit of plasticard). I decided as you can see to use the plasticard to hold the rail in place from one side. Only having two hands makes things really hard, so sometimes you have to think up different ways of doing things.
Below: And here it is in place (nearest the camera). I thought this was hard to do - you wait till I got to the check/wing rails!


Above: The wing/check rails were cut to length and angled (using a pair of pliers to hold whilst bending the rail. Why I didn't make them all regular lengths I've no idea! These rails were all angled and notched of course.
Below: Soldering these rails on was a complete pain in the proverbial. It didn't help that the soldering iron bit was dirty and I don't have anything to clean it with. They say it's very important to keep it clean, and I can see why now! Anyway, here is the finished (almost) crossing on the layout. All that is left to do is cut the flange gaps and isolating gaps and wire it up.


Above and below: I can see a lot of excess solder which could do with being cleaned up! I am very happy with it so far and it seems to be all working as far as gauge is concerned which is promising. It certainly isn't neat by any stretch, but it is my first bit of hand made track and I'm really happy with it all things considered. I have added a ruler on the bottom photo to give some scale to the photos.

So that's about it for now, I'm really hoping this will work as intended when I've wired it up and cut the gaps!
Comments
Post a Comment