Yesterday, I showed how using a Skilsaw, whilst taking time to set up, saves a lot more time and effort when you need to cut out components. Well today, it was time to machine the components; and this is another case where one tool makes this easy-peasy (with a bit of practice, of course). The router takes about the same amount of set-up as the Skilsaw, and indeed much of the process is the same. I'll be honest and say that this would be much easier to show in a video, than it is to explain it; so I hope you can all follow along!

Above: An annotated montage of the front and back of the router, highlighting the various parts that will be referenced throughout this post

Above: For machining rebates that are reasonably close to the edge of components, it's easier to use the guide that should come with the router. Follow the instructions to put it together, then inset it into the router frame as the photo shows.

Above: This photo shows how careful you need to be when measuring; router bits like this will have only two points where it is at its widest. Rotate the bit by hand (making sure your hand is nowhere near the on switch (or be safe, and unplug it!)), until the cutting edge is against the waste side of the line.
 Above: Now we can set the depth of the cutter. On the left you'll see the mark which dictates the depth of the rebate required. Lock the router height at this point (see "depth locking lever" on the first photo), then set the depth limiter. This is done by undoing the knob (in front of the measure on the router, right photo), then rotating the wheel where my hand is, which will drop the metal stopper (under the measure) until it hits the base plate. Fasten the black knob, and your max depth will be set. Don't forget to unlock the depth locking lever on the other side to raise the router back up; ready for use!

Above: As with the Skilsaw, it's a good idea to do a quick test "plunge". Again, I am half a millimetre out here, so the guide will need to be slightly adjusted.

Above: We can now go ahead and clamp the component down (with a spare bit of wood underneath, to keep the router guide from hitting the trestles). Routering is best done in 2mm or so depth increments; especially for materials like plywood, you will not want to try and take the full depth out in one go. You'll potentially damage the bit, plywood, or router if you do! Don't forget that you can use the locking lever to set the depth of the cut at the various heights; I always use it for the final full-depth pass, but I don't often bother in the interim increments. This only slows me down (and the lever can be difficult to release without accidentally moving the router mid-cut). Usually it's not too difficult to maintain an even enough pressure to keep the cutter at a set depth.

Above & below: It wasn't just straight cutters that I used for the box; I also used this rounding cutter. This will enable the lid to drop down without binding on the box itself. The result is shown below.

And there we have it; another 5 hours total for all the machining. You'll get quicker and quicker as you get used to routing; I haven't done a lot, which is why it took so long. By the end, I was getting a lot faster. It helps that all the cuts are at 6mm depth, so I only had to adjust this when changing bits.
Anyway, tomorrow will see my doing a test fit, and weather depending, I will try and apply some MDF primer to all of the components. Another couple of days and we should have our finished box!
Oh, and before I forget; Happy New Year to all readers!

Above: An annotated montage of the front and back of the router, highlighting the various parts that will be referenced throughout this post

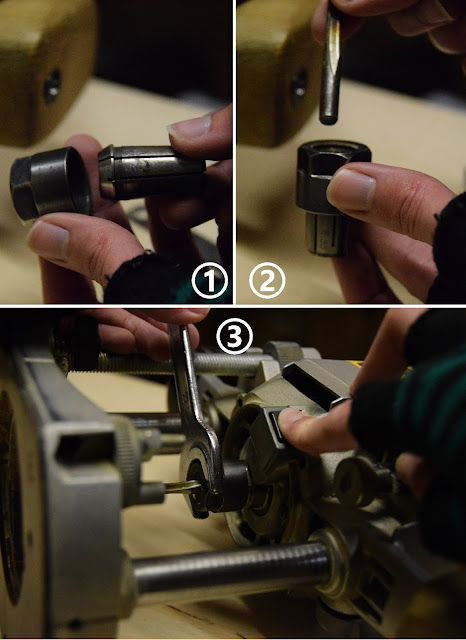
Above: Depending on the size of the shank of the router bit, you might need to exchange collets. (I realise at the time of writing this that showing step 3 first would make more sense, sorry!) This is done by pulling out the collet (1), and popping the correct sized one in its place. It'll click into position when it is in correctly. Then go ahead and insert the router bit into the collet (2), and then screw the whole assembly onto the router itself. Hold down the button that locks the spindle in place, and use the appropriate sized spanner to fasten (3). Note that when screwing/unscrewing the nut, it will appear to initially tighten, before loosening, then tightening fully. I believe this is due to the way the collet clamps onto the router bit; so make sure you have tightened it fully before using the router.

Above: For machining rebates that are reasonably close to the edge of components, it's easier to use the guide that should come with the router. Follow the instructions to put it together, then inset it into the router frame as the photo shows.

Above: I've annotated a couple notes to help you identify the parts to the guide. The screws (all 5 of them) hold the guide together, but I only adjust the 3 on the router itself. You can also use the wheel on the left to make minor adjustments, but I don't bother using it, as it's just as easy to undo the three screws and nudge the guide by hand.

Above: If you're not using the guide (i.e. for rebates far from the edge), you'll need to measure the distance from the closest point of the cutting bit, to the flat edge of the router base, so that you can use it to clamp a straight edge to use as a guide (as we did with the Skilsaw yesterday).

 Above: Now we can set the depth of the cutter. On the left you'll see the mark which dictates the depth of the rebate required. Lock the router height at this point (see "depth locking lever" on the first photo), then set the depth limiter. This is done by undoing the knob (in front of the measure on the router, right photo), then rotating the wheel where my hand is, which will drop the metal stopper (under the measure) until it hits the base plate. Fasten the black knob, and your max depth will be set. Don't forget to unlock the depth locking lever on the other side to raise the router back up; ready for use!
Above: As with the Skilsaw, it's a good idea to do a quick test "plunge". Again, I am half a millimetre out here, so the guide will need to be slightly adjusted.

Above: We can now go ahead and clamp the component down (with a spare bit of wood underneath, to keep the router guide from hitting the trestles). Routering is best done in 2mm or so depth increments; especially for materials like plywood, you will not want to try and take the full depth out in one go. You'll potentially damage the bit, plywood, or router if you do! Don't forget that you can use the locking lever to set the depth of the cut at the various heights; I always use it for the final full-depth pass, but I don't often bother in the interim increments. This only slows me down (and the lever can be difficult to release without accidentally moving the router mid-cut). Usually it's not too difficult to maintain an even enough pressure to keep the cutter at a set depth.

Above & below: It wasn't just straight cutters that I used for the box; I also used this rounding cutter. This will enable the lid to drop down without binding on the box itself. The result is shown below.

And there we have it; another 5 hours total for all the machining. You'll get quicker and quicker as you get used to routing; I haven't done a lot, which is why it took so long. By the end, I was getting a lot faster. It helps that all the cuts are at 6mm depth, so I only had to adjust this when changing bits.
Anyway, tomorrow will see my doing a test fit, and weather depending, I will try and apply some MDF primer to all of the components. Another couple of days and we should have our finished box!
Oh, and before I forget; Happy New Year to all readers!
Comments
Post a Comment