The layout box is now pretty much complete (excluding something to help keep the layout in place, and maybe some sort of latch to ensure the lid doesn't lift unintentionally). Let's jump straight to it...

Above: The final bit of painting was completed yesterday; all exterior faces had their 2nd coat of paint on (1), which enabled me to start gluing it all together. Unfortunately, things didn't out to be so simple, and as photo (2) shows, my Dad kindly planed 6mm of paint off of the edges; as the paint added enough thickness to stop the components sitting in their rebates. Eventually, the main shell and shelf was glued in place, and clamped up overnight (3). We initially had a little trouble lining up the rebates for the shelf to sit into; however, once the rear was clamped, it pulled everything into place nicely.
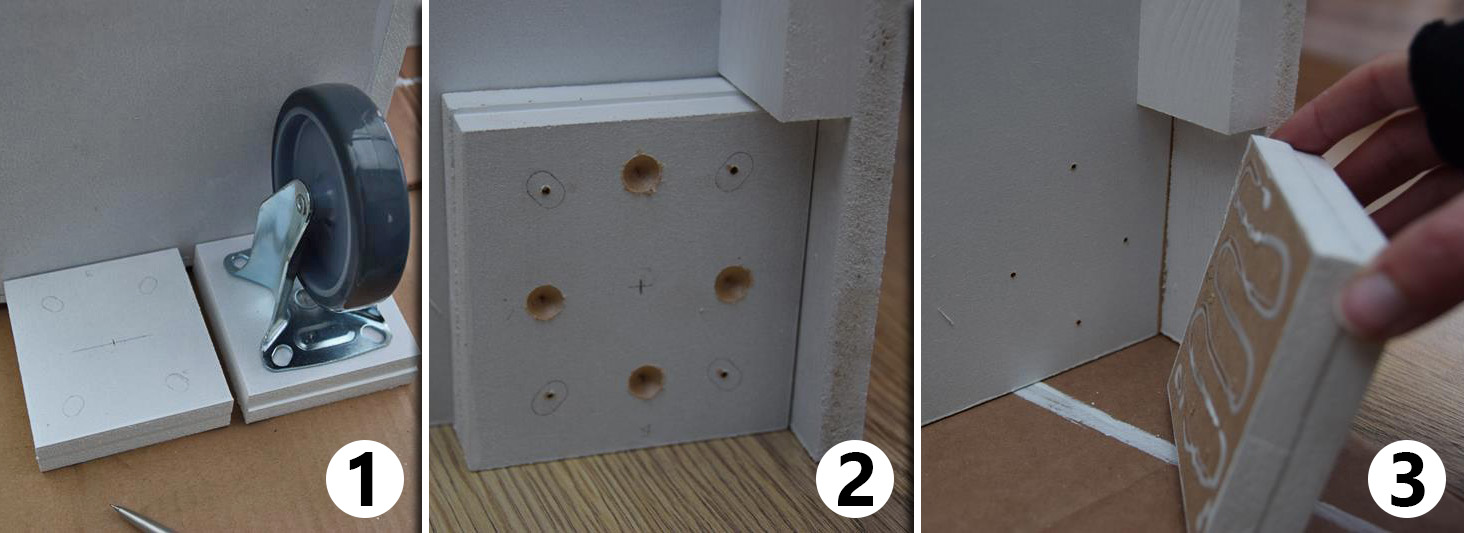
Above: This mornings first job was to glue and screw the castor wheels and associated blocks onto the bottom. Photo (1) shows as I line up the castors so that they lie flush on one edge. Holes were then drilled, 4 of which were also countersunk so that the screws don't interfere with the castor wheel base (2). It was then glued in place (3)...

...before being screwed as well (1). The castor wheels could then be screwed on; due to the screws being thin enough to fit entirely through the holes, washers were used to enable it to be screwed in place (2).

Above: Attention then turned to the sliding handle. In order to keep it relatively smooth in operation, I decided to fabricate some simple spacers (1) (just plasticard with holes drilled in them) to fit under the crossbars (2).

Above: The handle itself could then be assembled (I can't remember if I showed it, but the sides have circular rebates, into which the handle (part of an old outdoor chair saved from the offcut bin!) sits), and the handle itself was glued and also screwed in place (1). Note that the screw has been countersunk so that it doesn't stick out and catch on the sides. The other end of the handle had its PSE bar also glued and screwed in (again countersunk) (2).

Above: The three crossbars were then screwed in place. I actually diverted from my original design where the handle was pegged into its two positions. Instead, I've simplified it by locating the crossbars in specific places, which automatically lock the handle in its two positions. Hard to explain, easy to look at how it's done in the photo! The two crossbars screwed to the main box act as the limits of travel for the centre crossbar, which is screwed to the handle.

Above: All that was left to do was to secure the life-up lid in place. Here's a before (1), and an after (2). Nothing complicated, just two standard hinges screwed in place. In hindsight, it might be better to have two strips of wood to locate the hinges on top of, as I had to use some really short screws; so the strength may not be up to required standards...

Above: Which leaves us with just one more thing to do; test it out! To do that, it was time to fit the 4 mini castors onto the bottom of the layout, and put the box to use. As you can see, both parts fit in with millimetres to spare - perfect! All that's left is to find something to secure the layout to.
The box weighs a staggering 34.9kg, and with the layout and trolley etc in, it probably is approaching 60kg (a few kg more than my weight!). As such, the MDF obviously wasn't the right choice here, but it is what it is, and I have a very cunning plan of how to get the box in the car... more on that in the next blog entry!
Excellent work all round - hope its working well.
ReplyDeleteRegarding the hinge - you may be better using a piano hinge which can be cut to fit the length of the joint, can accommodate small screws but spreads the load along both edges - just an idea.
Pete
Many thanks, Pete!
DeleteThat's a good idea; it is a little bit tense opening and closing it, and I think a piano hinge would be a much better alternative (and also calm my nerves a bit!).
I haven't had the chance to test it out thoroughly, but the layout does seems to be nice and protected in there. Which reminds me; I ought to start the next phase of my plan soon...