Last blog entry, I shared a generous serving of the hundreds of sketches that I've drawn for Coastguard Creek. There will be a few more here, but this time I'd like to focus on how important it can be when layout planning to stop sketching and think logically for a moment! Let me explain...

...after months of relatively fruitless sketching, on New Years Eve I took a step back and remembered my mantra (which came about after numerous failed projects) of 'design for the space you have, not the space you want'. That restriction really helped with focusing my ideas, as per CC12, but even that didn't last long! It wasn't long before I went back to getting carried away with sketches of layouts that were too large (as documented last entry).
Fast forward to now, June 2022, and recent visits to exhibitions (in particular the RMweb Members Day) inspired me to find whatever time I could scrounge to work on ideas for Coastguard Creek. Taking Sandy Shores to two exhibitions made me realise, yet again, that I should remain realistic about what I can achieve given my situation in terms of storage and transportation - and base any plans around that! We'll come to the specifics of that in a bit, but before diving into designing, I thought it important to learn from past mistakes...
...the problems with my past layouts
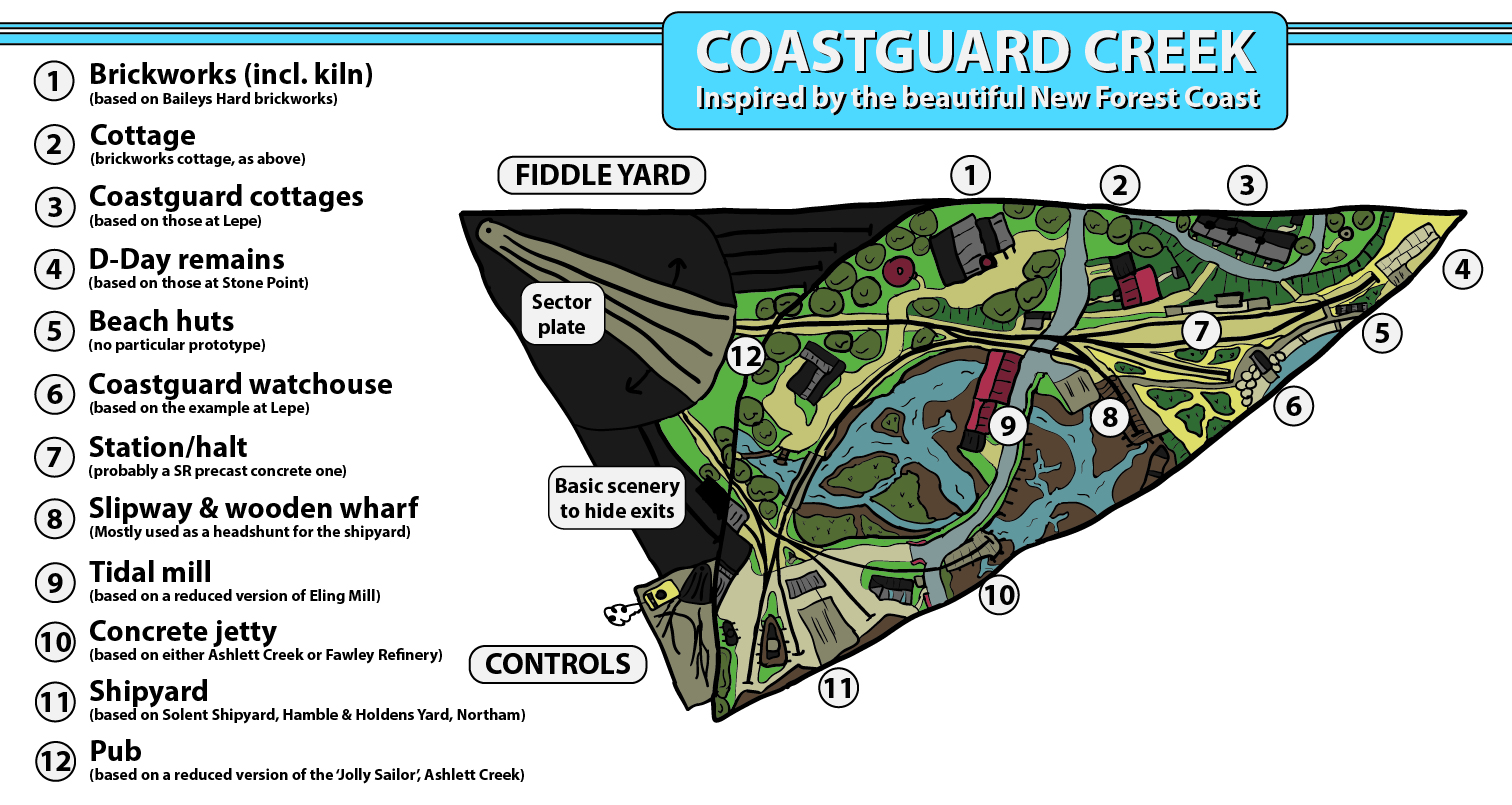
Looking at the original plan for Coastguard Creek with fresh eyes brought up some now-obvious problems. Aside from wanting more from the layout, I realised that it has the exact same problems as most of my past layouts (Sandy Shores included); firstly, the station/halt is almost immediately after the scenic exit, and secondly, the sidings do not have associated industries.

Above: In an effort to squeeze everything onto one board, too many compromises were made in the original plan. Note how, just like Sandy Shores, any passenger train at the halt would block off potential freight operations - so a passenger train would have to arrive and depart before the freight could come. In the real world, such a branch would probably be one-engine-in-steam anyway, but on a model railway that's an incredibly boring way to operate a layout!
Freight
So, if freight is thus the main operational point of my layouts, why then do I always end up with generic sidings that result in completely random shuffling of wagons? Even on Sandy Shores, there is no industry associated with either siding. Taking a step back, I realised that this was a problem with my original plan for Coastguard Creek - none of the sidings have a particular use, although I suppose you could say that the boatyard does have its own siding; albeit on the hidden track inside the building!

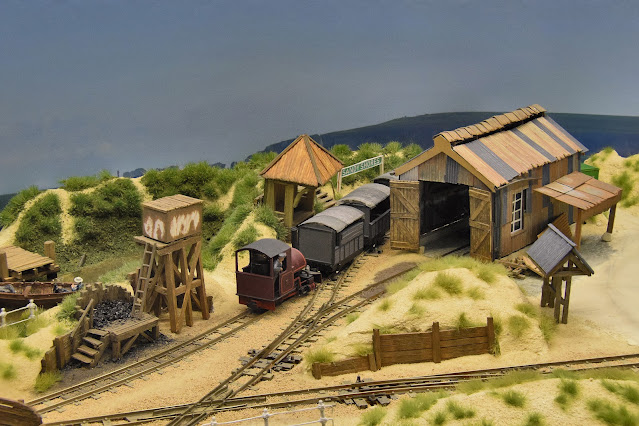
Above: A particularly cruel image of Calshot MKII at the Brockenhurst exhibition in 2010! Aside from the lack of backscene in this shot (although to be fair this was taken from the fiddle yard), it's the lack of any shunting purpose that I'm trying to draw attention to here. None of the wagons have loads, and none of the sidings really serve any industry or pupose. The only thing useful in terms of freight facilities is the very short loading platform just visible at the back left.
Backscenes
As shown above, one of my biggest concerns is actually what to do with backscenes. I prefer tall, one piece backscenes - which is why whenever I exhibit Sandy Shores I go to the extreme effort of re-attaching the backscene with Blue Tac to its (single hardboard) board. It's a very inconvenient set-up, and not very neat along the edges, but I just can't see a way around it - because I need to keep the paper backscene safe, so it must be removed and put into its tube for storage/transportation. Failure to do this has, in the past, resulted in small rips or tears. A PVC vinyl backscene (like you'd find with outside banners) would be more durable, but it would be too shiny, and hard to hang perfectly. Ideally, I'd be able to fasten the paper backscene with adhesive-backed magnetic strips. I did consider this for Sandy Shores, but I just don't think there is enough clearance, and I'm not sure if that would result in visible horizontal banding from the front.
The backscene must also surround the scene in such a way that from most angles it would fill the frame (as looking at the scene through a camera). Old AGWI Rd was an awesome design in terms of a layout theme and shape, but impossible to fit a backscene to; not least because it wouldn't be visible from many angles!

Above: Old AGWI Rd. was a classic example of forgetting about the importance of backscenes. No matter how you set-up a backscene, it would never be able to be seen in every normal viewing point - one of the 'wings' (the far one - a jetty board) would've been left without one, with the backscene only on the near edge of the closest boards. This means views of the jetty would likely look pretty bad on camera!
Making the layout too big!

Above: My biggest fail in my model railway past was The Old Road. An exciting layout, with a fair amount of potential, but look at the bloody size of it! Don't laugh, but it took me until setting it up outside to realise that I had nowhere to set up more than two boards at a time inside. Whilst I did build a few buildings, the boards remained in my tiny shed, and never again worked on. When the shed needed to be demolished, the boards went with it; the softwood battens re-used for Old AGWI Rd, until that also met it's demise (again, because it was too big to set-up in the house)! See a recurring theme here?!
The only layouts that I've built that have been a 'success' are layouts with only one board; with any later extensions always causing the layouts eventual demise. That says to me that I should build a small layout that will be fun to operate and include everything I would like from the outset, and that should never need to be extended.
Operational lessons learnt from recent shows
I enjoy building scenery more than operating, but as I like to exhibit my layouts there's got to be a balance somewhere. I've also recently heard from quite a few people how much they enjoy having a layout permanently (and conveniently) set-up at home to shunt wagons for an hour or so every now and then - that sounds like a great idea to me! Looking at my current plans, and how they would be run (should they be built), has made me look at things a little differently. As mentioned earlier, this has become particularly obvious having exhibited Sandy Shores recently at both Narrow Gauge South, and the SSWRS show in Wilton.
1) Something should always be moving
On a basic level, I found that if nothing moves on the layout within 20 seconds or so, a good number of people will just move on. That said, with Sandy Shores at SSWRS, I did become more proficient at swapping locos from the shed to mitigate the downtime whilst preparing the next train in the fiddle yard.

Above: Whilst Sandy Shores does have uncoupling magnets, they have not proved successful.
Something surprising to me, however, was that despite there being only two sidings, people seemed to really enjoy watching me shunt wagons. Especially, much to my surprise, the intricacies of uncoupling wagons by hand. All of this has upped both my interest in operating, and my desire to reduce downtime/increase shunting maneouvres. OK, so some people commented on 'the hand of god', but the vast majority of people actually preferred the interactivity of me manually uncoupling. You'll never please everyone!
2) Fiddle yards should be convenient and quick to use
It has also made me realise that fiddle yards/off-stage areas must be easy to use - the faff of lining up Sandy Shores' turntable by hand/sight is a problem not just in terms of time wasted, but also the frequent derailments resulting from inaccurate alignment:

I also ran into problems with not having quite enough space; the folding stock tray beneath is too far to be useful for it's intended purpose (although it's great for holding cups of tea and cake), and I found that I kept knocking the wagons off the turntable tracks due to both the narrow clearance between the tracks, and the lightweight nature of the wagons (the latter of which was mostly dealt with by adding 'Liquid Gravity' from Deluxe Materials). Swapping wagons to make up different trains is also somewhat fiddly.
3) Shunt like you mean it!
Despite having no real sequence of shunting on Sandy Shores, I have learnt that one way to alleviate boredom is to set a train up in the fiddleyard that has a random mix of wagons in a random order, bring them onto the scenic side, and then try to shunt those wagons into the two sidings so that they are in a more uniform order. I suppose the next step up would be a card system (as per Michael Campbell's Loctern Quay). As a further step up from that, Coastguard Creek will feature more obvious industries, and associated sidings; therefore hopefully providing opportunities for more intentional freight movements (and potentially quite challenging ones)! Something I also realised is that I don't have a brake van on Sandy Shores - another aspect which will also add a small level of complexity to operations. To be fair, I did consider this in later plans for Coastguard Creek; thus including a short siding from the run-around loop(s) to hold a brake van.
4) Know the limits of one-man operation
Perhaps the biggest lesson I've taken away (which I should've done many years ago considering I've been exhibiting my layouts now for over 10 years!) is that an exhibition (or exhibitable) layout should be designed to be run by the number of people you expect to have with you at shows. In my case, just me! As I'm always solo, it also means that, should I be fortunate (it's happened once) to have someone operate my layout for an hour so, that it should be easy for them; even if they have little experience. When you've exhibited solo for so long, you forget the quirks that your layout has! This either has to be written down and explained to the new operator, or needs to be designed out/retroactively fixed.

Above: Sandy Shores was designed from the outset to fit in my little car. OK, so it's not very neat, but it does work! The great thing about this layout is that you don't need a single tool to assemble/disassemble it.
The limits of one-man operation also extend to operational complexity, and also the size of the layout and ease of assembly/disassembly. I think I struck a good balance with Sandy Shores (especially because it requires no tools to put together), but in terms of any new layouts, this always has to be a major factor in their design. There's no use building a layout with more than one scenic section, or more than one fiddle yard as I'll only be able to operate one at a time! Similarly, if the layout is too big, I won't be able to see what's going on at the other end.
5) Interactivity with the public
Whilst at the SSWRS show, a layout across from me had what I can only describe as 'vibrating chickens' in a farm yard; the kids (and grown ups) loved it! It made me think that although I put a lot of thought into little cameos, I've never taken the initiative to make them more of a focus for visitors. I don't just mean in terms of animations, but also making lists for visitors to try and encourage them to look for the details. I know this has proved very popular on other layouts, but I don't know why I hadn't considered it before!
A second thing I would love to try is, as I just hinted at, animations. Though I'm thinking less about quirky things like vibrating chickens, and more about more... practical applications. Back at the RMweb SWAG do, I was fortunate enough to operate the exquisite Bridport Town. Aside from the fact that I can't remember the last time I operated someone elses layout, what struck me was the added interest that the working signals and level crossing gates added. Not only was it fun, but it also added operational complexity! Something I'm dying to add on Coastguard Creek is a working swing bridge (as well as perhaps working crossing gates and semaphore signals). I'd also love to model a working travelling steam crane, but I think that is far beyond my skill level!
%20(Copy).JPG)
Above: Bridport Town - Dave Taylor's masterpiece! The crossing gate is activated by a switch, which opens the four gates in turn. Until the crossing is open to rail traffic, the fiddle yard (out of shot to the left) is not electrically powered. Of course, this doesn't mean you can't cause havoc on the scenic side, but it's a neat safety feature, and thankfully I did manage to avoid any gate incidents when operating it at the SWAG do. As mentioned, all the signals also work; providing a really fun aspect to the operation (assuming you remember to change and reset them!).
Back to basics...

The absolute maximum size I can fit in my car is a 1.4m x 0.9m board (tapering to 0.6m on one end) - assuming that it's overall height is no more than 0.4m. The height restrictions (as shown on the left hand sketch) are in place because the rear of the car obviously slopes - thus the taller/higher-up a board is, the shorter it has to be. In order to fit (stack) a second board, board length would probably have to be reduced to 1.2m (assuming they can be stacked to be no taller than 0.6m - which is unlikely unless I make the backscene removable). The boot 'lip'/seal intrudes on the overall width - bringing it down from 1m to a maximum of 0.9m as shown. To further complicate things, due to curves, there is only a 0.7m long flat section at the bottom, so the boards would need to be lifted by 15cm on top of the 15cm of the lip itself to fit the full 0.9m width - thus a fake floor would likely be beneficial, unless there are boxes that the layout can be stacked on top of.
The breakthrough? A layout of two 'halves'...
With more and more scenic ideas, I completely rethought how the layout would be set up. At a basic level, there were four ways to approach this layout:
- As a portable single board layout (as per the original plan)
- As a portable multi-board layout (like most exhibition layouts)
- As a series of small/micro portable independent (i.e with their own frame/backscene) but connectable modules
- As a semi-permanent home layout, with an additional module (or two) to take to exhibitions
...the exhibition layout

Above: A group of brave souls playing cricket in the middle of the Solent on the Bramble bank sandbar at low tide! A most bewildering and amusing sight, I must admit. I don't think you could find anything more British if you tried! And no, I won't be modelling it.


The home layout...

- Have at least one rail-served industry to marshal freight to properly, preferably more if possible.
- Be a 'line in a landscape' with plenty of opportunities for typical country scenes/cameos.
- Have recognisable New Forest features (cattle grid, ford, mill pond etc)
- Avoid extreme compression to the extent that it hinders operation
- Avoid trying to cram too much into a space - let the scene 'breathe' instead
- Have at least one bridge (I'd love a working swing bridge to add some further interest, although if I can fit it into the exhibition layout that would be best!)
- Have a sweeping trackplan and avoid elements parallel to the baseboard edge
- Make the scenery dictate the baseboard shapes, whilst remaining in sensible/manageable sizes
Thoughts for further development


Above: (CC20) ...this latest sketch of Bramble's Boatyard, now that I look at it, has the exact same trackplan as Sandy Shores! In reality, another siding would be beneficial, but I'll wait until I can do some mock-ups to see what I can fit in the available space. I'm sure there will be many more variants to come - a small swing bridge extension for added interest at exhibitions would be great, but would contradict my liking for a low tide scene!
Next time: Potential alternate history of the area/railway, research into New Forest industries, and further prototype inspiration.
Thanks for reading; please do post any comments or questions down below! I post fairly frequently on my Twitter page @StudioJamming which often includes sneak peaks of my modelmaking projects for BRM and any photographs I take. It's the best way to find out what I'm up to, as well as seeing some of my modelmaking tips and what goes on behind-the-scenes!
Comments
Post a Comment