This entry was supposed to deal with an alternate history of the line/area (which had already been delayed for probably over a year - I had multiple directions I could take, and I wasn't sure which alternate timeline would tie in best with the layout because I hadn't got a firm layout design!)...
...however, this past week, I'm happy to say that things have started to fall into place; thanks mostly to a request by BRM (British Railway Modelling) to photograph a particular layout at a show. This will all make sense in a bit; so please hear me out (!), but that does unfortunately mean that for the time being, the full alternate history will have to wait (again!). I have, however, started writing it, and ammending things that I had already prepared for that blog entry - fingers crossed nothing changes between now and then!
HELPFUL NOTE: I've added 1 or 2 sentence TLDR (too long, didn't read) summaries at the beginning of each section - just look for the green TLDR. I know I can waffle on, so it's the least I could do! It might also be worth reading the captions under each diagram so that you know what you're looking at.
A stroke of luck
TLDR: Photographing Redbridge Wharf for BRM has allowed me to slim down my options; as I no longer feel I need to model a sleeper/timber yard as they've done such a good job of it!
The layout I was asked to photograph was Redbridge Wharf - built by members of the Winchester Railway Modellers. I first saw it back in March at Ally Pally, though I was really annoyed because my camera ran out of battery by the time I got around to it. Needless to say, the opportunity to photograph it properly made me really happy; especially for a magazine! Being my first layout photoshoot, I was a little nervous, but equally excited - especially as I was now able to get whatever shots I wanted from whatever angle.
So what's that got to do with the latest layout idea? Well, you may remember that in the last blog entry I looked at Eling Wharf (just around the corner from Redbridge in real life), and discovered that it featured a creosote works/timber yard. This threw a spanner in the works, because I thought it was a very unusual and interesting prototype that would be great to model. As it turns out, the real Redbridge had a very similar plant, and Redbridge Wharf features exactly that! I can therefore safely say that I 'don't need' to model Eling anymore - because the Winchester folk have done such a fantastic job of modelling something incredibly similar to what I had in mind.
We did joke that I could build an extension to their layout to bring it around to Eling, but that's by the by! Anyway, this means that I could effectively cross off a large section from my inspiration list, and thus narrow down my options.
To see why, just take a look at this photo which I've been allowed to share (as it won't be used by BRM due mostly to the bit of paper behind the shed that I didn't notice!). Having quickly brightened the shadows to better show the modelled creosote impregnation pressure vessels, you can see the attention to detail that the Winchester club have put into modelling this unique scene. I don't see the point in creating a layout with a duplicate scene; especially one that has been modelled so well, and on such a large scale:
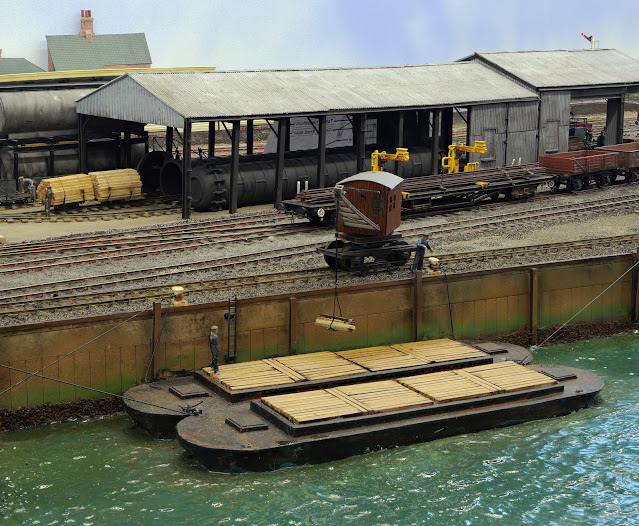
Above: Redbridge Wharf features the same design of creosote pressure vessels (I can't remember the proper name for them) as at Eling Wharf, along with other similar buildings and features; like the loading conveyor, sawmill, workshop, and sleeper stacks. Note the narrow gauge manhandled wagons. The doors of the long pressure tubes open, and temporary rails are slotted into place, before a line of the wagons (with a big bundle of railway sleepers) is pulled in with a powered capstan. The rails are then removed, the vessel sealed, and the creosote is impregnated at a high pressure into the sleeper - IIRC for 7 hours. This British Pathe video shows the process well.
In some way, this revelation may come across as being defeatist - but actually it's a relief because I've really been struggling to narrow my options down - hence the radio silence on this project as it had completely stalled. There are of course some elements from Redbridge Wharf that I am still looking to include; such as the barges, travelling crane, and wharf - but now I can focus on another industry or subject without feeling like I'm missing out...
By the way, look out for my photos of Redbridge Wharf in an upcoming issue of BRM - I'm not sure what month it'll come out, but probably not for a while. My thanks go to Andy York, who has already edited the photos in a way that really makes them 'pop', to Phil Parker, who helped and gave me advice during the shoot, and to the Winchester group for being so accommodating and friendly throughout.
So, what's changed, and why?
TLDR: Now I plan to build one, medium-sized layout; not a micro layout and a large home layout!
Last time I discussed my plans, I left having more or less decided that I would build two layouts; the first, a tiny exhibition layout based on a boatyard, and afterwards, a large layout in my bedroom going around 2 or 3 walls.
I felt that the boatyard micro layout was a safe bet, but you may remember that I had my doubts about the large home layout - specifically that once I had built it, I would probably not run it as much as I should. Not least because I would not be able to build a roundy-roundy, and so could never have a lazy running day, or enjoy watching a train go around whilst also shunting a set of sidings.
Having watched layouts like Redbridge Wharf at the exhibition, I now feel that a roundy-roundy is basically a must-have in a bedroom setting for me. However, that isn't practical in the space available, and besides, I don't have enough stock to make it worthwhile. Redbridge Wharf works so well because it is a mainline junction layout with a complex set of sidings; resulting in a large diversity of movements. It's also a huge layout, with an equally huge fiddle yard. My room is tiny, and even the simple plan drawn up earlier would not have fitted in the space, let alone adding a roundy-roundy element!
Even if the coastal themed bedroom layout (Leape, as I called it) would have fitted in the space, it was not only boring operationally, but thematically didn't make sense - the real 1890s/early 1900s lines proposed to go from Eling to Lepe were scrapped for good reason. Whilst Lepe is close to the IoW, and also could've been a base for ships to the Channel Islands, it was found that the pier that was proposed to have been built would have been very exposed, and would not have been suitable for large ships. Additionally, Lepe is in the middle of nowhere -"I can't imagine a line less called for or requested" was a relevant quote at that time! I too was struggling to design a layout based on Lepe that would be plausible. There was no need for a passenger service (but I still wanted a halt at the very least), and freight was also non-existant. The location is beautiful, but a railway line simply could not be justified.
As such, my current idea is to abandon the Lepe/Leape idea, and build just one layout. Onto that, there is perhaps potential to add narrow, non-scenic boards to create a circuit of track should I wish to in the future for home/testing use. Failing that, I could simply build a separate simple test circuit on identical narrow plain boards that can be stowed away easily. Which I choose will depend mostly on the board shape - for example, on the design below it wouldn't be practical to include a loop, but it might be if the curved shape was reversed. Speaking of the design...
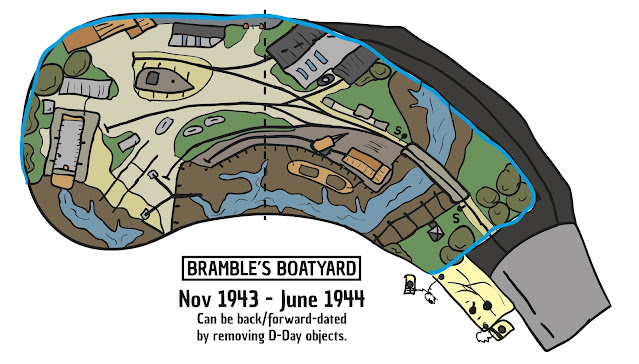
...you may therefore think that the small version of 'Brambles Boatyard' that I previously designed still fits the bill. The truth is... well... perhaps this sketch might be a better way to break the news...
Above: An early idea for my (double(?) the original size) layout plan; Bramble's Boatyard. Yes, usual disclaimer that it's a freehand sketch and therefore likely to be a bit on the optimistic side!
...yes, things might have gone up in scope... again! I know, I know, I spent most of a previous entry explaining how I need to reign in the size because of my tiny car that will be used to transport it. However, I think the extra size and complexity will be worth it. Hell, I would now be happy to borrow/hire a larger vehicle to transport it to shows if need-be!
Why? Because...
- ... of the earlier points about the larger 'home layout' not fitting my needs...
- ... the original tiny Bramble's Boatyard was limited in scope and operation...
- ... I'd rather have one small-to-medium size layout, than two layouts of a similar theme...
- ... there are other vehicles I could potentially borrow for transport...
- ... I'd like a layout with more space to set the railway in the landscape, and to set the track away from the front board edge (another side-effect of having photographed other layouts).
There's also, as you might've noticed if you read the text in the sketch above, another reason to change tact - a new theme!
D-Day
TLDR: Because of the photoshoot (and I also blame Graham Muspratt(!)), I finally bought a USA tank loco. This reminded me (see the first bullet point below) of the impact that D-Day preparations had on both the railways, and the local area; with an intention to have this as the focus for the new layout!
Many of my early sketches featured remnants of D-Day preparations, but nothing more. With the 'closing door' that is no longer 'needing' to model a timber/creosote yard, I wanted something fairly unique (in terms of modelled subjects) to fill the void - whilst a boatyard is quite a rare subject in itself, I was looking for something... 'more'. I love to model the unusual (Sandy Shores, the Fawley Oil Refinery, RAF Calshot etc.), and, aside from being a major historical event, the D-Day preparations are rarely modelled. Whilst I'm sure there are others, the only layout that comes to mind is 'Operation Overlord' - a layout on a much grander scale, in a more urban setting.
A few other things swayed my decision...
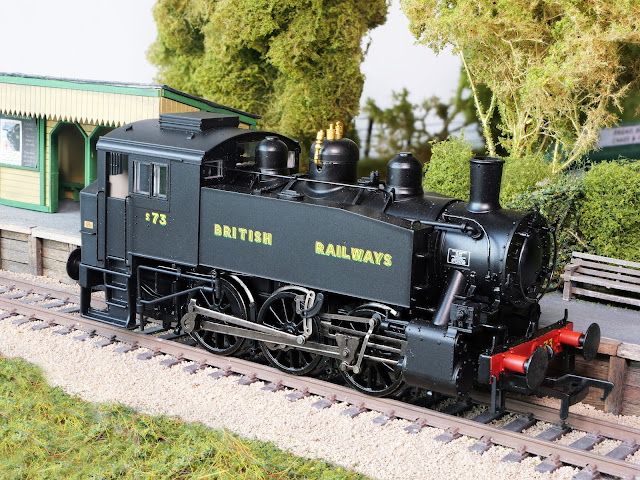
- ...thanks partly to seeing one on Winchester Railway Modeller's 'Redbridge Wharf' and also a healthy dose of persuasion by Graham Muspratt (of Canute Road Quay fame), I purchased a USA tank loco. The real ones were, I believe, brought over in 1943, with some used during the preparations in the run-up to D-Day. After the war, these engines (now surplus to requirements) were officially transferred to Eastleigh (I've no clue where they were used before that, although most were either in storage or sent abroad) as they were ideal for use around the docks in nearby Southampton; their short wheelbase capable of negotiating the sharp curves. After servicing/overhaul, they were officially introduced in 1946 as replacements for the ageing B4 dock tanks there.
Above: Sadly, there were none of the pre-nationalisation versions available to buy, so I've had to settle with the post-1948 version, but I can live with that minor discrepancy, even if I'm sure someone will flag it up at exhibitions! It really is a lovely model though, with a lot of fine detail and a complex bit of valve gear. The weight also makes me think that it will be quite a powerful locomotive (not that that's important for this layout).
Anyway, further research also led me to...- ... the discovery of a company that sell relevant D-Day related products (landing craft and Mulberry Beetles etc.)...
- ... uncovering a fairly substantial amount of research about the D-Day preparations here in the New Forest, and in particular along the coast, and...
- ... realising the significance of D-Day preparations to both the variety and increase in traffic levels on the railway at that time - thus providing more interesting wagon loads and locomotives; and larger quantities of them! One of the reasons I hadn't pressed ahead with Bramble's Boatyard is that I found it hard to justify such a small boatyard being rail-served.
As a result, I felt that this also created an 'excuse' for SR locos to be on a private siding/site (i.e. 'my' fictional private rail-served boatyard). After all, many such boatyards (even tiny ones) were requisitioned by the military to produce various components for the invasion; such as the Mulberry Beetles that I intend to model. During times of war, almost anything goes! I'll ponder it more next time, but I don't think it's a huge stretch to say that an extension would've been made to the Fawley line down to such a boatyard specifically for WWII - after all, I believe the nearby Marchwood Military Port was such an example. The latest plan in more detail
TLDR: Bramble's Boatyard will, at the very least, feature a working swing bridge and signals - hopefully also two types of crane. I've designed the layout to ensure it should be able to be photographed with interesting sight lines, and with plenty of depth to the scene.
First though, let's address the elephant in the room - the name; as I've now put myself in the awkward position that I have two names and only one layout! It's a tough choice because I like the 'Coastguard Creek' name and it's what I've used for my blog names in various places. However, I think 'Bramble's Boatyard' best fits the subject of the layout - I'll leave the blog names as they are - that way, should I ever change my mind in the future, I still have an option to resurrect 'CC' and use it for another layout. That said, I welcome any suggestions!
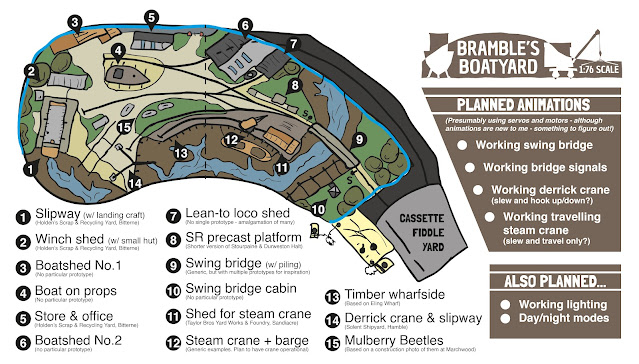
Anyway, here's an annotated version of the same sketch from earlier. There's a lot to take in, so you might want to click on the image to bring up the full-size version:
Above: This annotated view explains the features I plan to include, even though I'm sure this plan will need to undergo various changes (click to see full-size image). By the way, #8, the platform, is a 'nice to have' rather than an essential part of the layout. Looking at the plan, it is a tight squeeze! My thinking was that such a tiny platform might've been built for boatyard workers during the run-up to WWII, but I don't know if there is a precedent for this.
Let's quickly run through the main aspects of the plan:
Animations
Back at the RMweb 'SWAG do' in April, I was fortunate enough to operate Dave Taylor's Bridport Town (see here). That layout featured a switch that operated the four level crossing gates independently. Together with the fact that all signals were operational, it made me realise just how much that adds to not only the visitor experience, but arguably moreso to the operator's experience. I used to think animations were gimmicks, but that's probably because I had only seen those that don't relate to railway-related operations. As you can see, for Bramble's Boatyard, at the very least, I plan to have the swing bridge operable, as well as the semaphore signals protecting it. Bonus animations are inspired by Redbridge Wharf, and would be the two cranes; the derrick crane, and the travelling steam crane - although, as I'll explain later, I might have to scale down my expectations here; one step at a time! Spacious yet feature-filled
What should become clear is that I've crammed a lot into the layout, hopefully whilst still giving room for the scene to 'breathe'. Something gleaned from seeing Redbridge Wharf is that it's really helpful to have a strip of basic scenery at the front. On other layouts at the exhibition, I found it difficult to photograph many of them because the tracks were too close to the front edge of the board. By modelling most of the creek bed, I've created a 'buffer' to give the scene extra depth - particularly for photography purposes, but it will also minimise damage from visitors.
Baseboards
Normally, I would avoid having a baseboard joint where there is water, but the one(s?) on Redbridge Wharf, whilst fairly obvious, proved to me that if you position major viewpoints away from that area, you can avoid joins showing in photos. Besides, it can usually easily be edited out in 'post'! Of more importance is ensuring any baseboard joints are away from points - this is something that will need to be figured out using a full-scale mock-up.
Lighting
One of the layouts at the exhibition - Wickwar, built by Farnham & District MRC - had two lighting modes - a day mode, and a dusk mode. With my interest in photography, I loved this idea, and whilst I have heard of it being done before, I had never seen it in person. The effect can be very convincing, so it's something that I'd love to do - along with adding other light sources (building lights, outside lights etc); another thing I've never done (apart from streetlighting on a small diorama).
Other new features
Elsewhere, the rest of the design is fairly self explanatory, and most is similar from the original Bramble's Boatyard. However, with the new focus on D-Day preparations, there is now a landing craft undergoing maintenance on the main slipway, and a second, more basic slipway with concrete Mulberry Beetles being constructed. The latter is based on a photo taken at nearby Marchwood, and the slipway is borrowed from Solent Shipyard at Hamble as it appeared around that time.
Inspired by a photo of a yard in Sandiacre, between Nottingham and Derby (probably the furthest piece of inspiration!), I've also added a shed for the travelling steam crane. This is a corrugated iron structure, with tall doors; presumably which allowed the crane to be taken inside and light maintenance carried out away from the weather. I may, however, need to add a wider section of wharf and model a small building or similar in front to offset it's tall height! That will be another thing to figure out during the mock-up stage.
One thing which I've not yet decided on is what form the bridge's operating hut will take. I quite like the idea of a square building with a hipped roof, but I'm not sure whether to make it freelance, or base it on a small SR signal box. I suspect I'll go freelance for additional interest, but happy to have suggestions thrown in my direction!
Controls
TLDR: Bramble's Boatyard will be DC controlled; using two controllers that will operate not just the trains, but also the two cranes... hopefully! Lessons have been learnt from my previous layout; resulting in a control panel with 'positive feedback'.
Bramble's Boatyard will be controlled with DC rather than DCC - just as all my layouts have been. The reason for this is partly due to cost, but mostly due to not wanting to have anything to do with modifying locomotives! To be honest, I also like the physical nature of DC control, and I'm not interested in lights or sound on locomotives (don't get me started on the tinny speakers found in locomotives!).
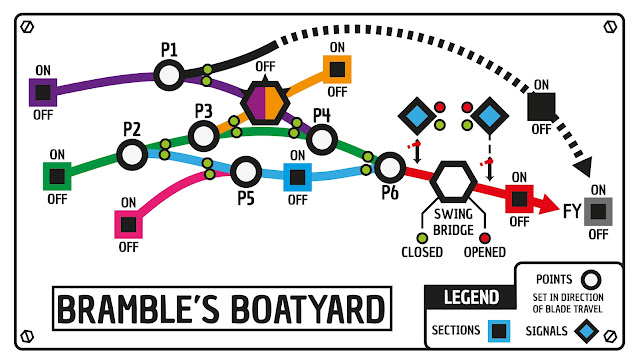
Above: The main control panel uses lessons learnt from my previous layout, Sandy Shores, to provide visual feedback of what has been set. LEDs will now light up for point positions, signal positions, and the swing bridge position - with colours for the latter two; red denoting danger, whilst green denotes a clear route. Note that a 'closed' bridge means it is closed to boats, hence the green 'cleared' indicator for trains. To be honest, having 8 switchable sections is probably overkill, but they're not difficult to implement, and will provide an additional layer of flexibility.
Those who remember seeing the control panel from Sandy Shores may note that it's quite similar, but with two specific improvements. Firstly, the crossing rotary switch (the hexagon with the purple and orange colours) is actually located ON the crossing, rather than along the bottom somewhere. I've lost track of the number of times that I've forgotten to change it on Sandy Shores, and wondered why nothing was working! Another improvement is the inclusion of coloured LED indicators to show the current position of points (and for this layout that includes signals and the swing bridge). I don't need to bother with the section switches (squares) as they don't use sprung switches; thus it's easy to see what state they are in!
This should hopefully lessen mistakes, and, should I ever be able to have operating assistance at a show, things should be more logical and user-friendly... once you take a moment to study the diagram, of course! To further help in this regard, I plan to take a leaf out of Dave Taylors book, and include a bit of 'interlocking' in the simple form of: "If the bridge is set to open (to boats), the red section will automatically turn off" - meaning no train will be able to move in that section.
Above: This yellow panel will (hopefully(!)) enable the switching of the two controllers. That way, I should be able to use them to control all manner of things; not just the trains! It might not work in practice though... we'll see...
Bear in mind that I have no experience of animating things, but with my limited electronic knowledge, I'm hoping that to control the travelling crane's slew, I can add a second set of contact strips to the crane's chassis that lead solely to the slewing motor - that way, I can both move the crane along it's track, and also slew it from side to side. If that is the case, I'll probably alter the track plan to enable the crane to travel along the rest of the layout, too - after all, the real things were actually used to move wagons! This has the added bonus of having another siding to use.
Speaking of improvements...
TLDR: I will try other baseboard shape configurations, but other than that, a mock-up should be the next step to see what needs to be modified. I also feel the area behind the swing bridge needs attention - specifically something in the corner to distract the eye.
As noted, this is an early plan - in fact, the very first one of this modified layout idea; that's how excited I am by this plan! But before I do anything else, I'll need to grab some track and work out exactly how big this layout would need to be, and go from there. I suspect more compromises will need to be made, but I've never been more hyped about a layout plan - certainly not since I designed Sandy Shores. Considering that I've drawn hundreds of sketches for this project, I think that's a good sign! I will, however, try to reverse the direction of the curved board (and perhaps try other shapes to find the best fit) in order to add a potential non-scenic loop for lazy running. If it doesn't work, that's fine, but it's certainly a 'nice-to-have'.
One thing I have spotted is the comparatively bare area behind the bridge. I was thinking that the brickworks building and chimney shown in previous designs might be a good corner filler; and distract the eye from looking at the join between creek and backscene. I also need to do more research on what protective piling is needed for the swing bridge, and what channel markers (if any) are needed.
The end... for now...
I think that'll do for this blog entry! If you have any questions or comments, I'd love to hear them. Equally, if you can shed more light on any of the points raised throughout this post, I would really appreciate that. With a bit more planning, I think this could turn into quite an interesting little layout - I'm certainly enjoying the research phase!
Until next time!
Jamie


" I don't have enough stock to make it worthwhile." - seriously? I don't think that sort of problem lasts very long...
ReplyDeleteBased on the fact I have bought 3 small locos between starting this project and now, there may be an element of truth to that, Phil! I've also come to realise that, for me at least, there is no such thing as 'too many 12t vans' - the 4 I have simply aren't enough...
Delete...still, I feel my ragtag collection of rolling stock is certainly a lot smaller than most peoples' - I'm not much of a collector in the rolling stock department. Sandy Shores runs on 2 locomotives, and a small collection of wagons; I think Bramble's Boatyard is likely to have triple the locomotive count, but not exceed the wagon count (in fact, I don't think it reaches Sandy Shores' yet!). For a passenger train, I have just one coach/carriage - assuming I will run such a service at all.
I still need to get rid of the old stock from my childhood before even thinking about purchasing more in the freight wagon department - though I'd rather buy wagons in packs of 3; which so far seems limited to 16t minerals. I'm secretly hoping Bachmann will reintroduce multipacks on vans...
For a passenger train, you need to look to Devonport Dockyard. Years ago, I built their internal user version, and it would be perfect for this. I'll try and find a bigger photo, but for the minute: http://www.pagenumberone.co.uk/layouts/dock/photos.htm
DeleteAs for wagons, Parkside is your friend. None of this "buy a triple pack" nonsence!
That's interesting, thanks for that - I certainly hadn't considered a more homebrew approach (and they are rather charming)! Last year, after much deliberation, I settled on an ex-LSWR 58ft instead - but now that you've shown me that... more thinking is needed!
DeleteYou're right about Parkside, and I did look at them before, but it was the transfers that put me off as I've never done anything like it. Perhaps it's time to bite the bullet, as it's a much more affordable way of forming a rake!