A while back (don't ask me where the time has gone, as I've no idea!), I started construction of a brake van for Sandy Shores. You may remember that my lofty goal was to have it finished or at least semi-presentable for use at the 009 Society's 50th Anniversary Exhibition at Statfold Barn. You may also have figured out by now that, unsurprisingly, it didn't happen that way!
Here's where we left off, after having abandoned the original squat design in favour of a much taller one:
Above: Incidentally, most people seemed to prefer the original squat design, much to my surprise! Still, as I was the one that had to live with it, I opted for the more sensible headroom option (though we'll find out later if that was a wise move)...
For now, let's jump forward a bit to being at the place where we were staying for the exhibition, near Birmingham (which was actually the other side of Birmingham from the exhibition, near to Ironbridge!). As I had to rebuild the fiddle yard as a priority before leaving, no more work commenced on the brake van until we arrived at the holiday cottage (and even then I first had to fix the lighthouse railings as my dad accidentally let it fall out of the car... but that's another matter!)
Above: Whilst the paint was drying, I realised another detail was needed, this time on the chassis rather than the body - footboards. Whilst a neater representation could probably be made from thin brass or similar, I'm not familiar with working in metal, so it was time to crack out the plasticard again! Each footboard was made from 5 pieces - 1x 0.010" rectangle for the footboard, 2x 0.030" strips 2.5mm long for the underside supports, and 2x 0.030" strips 4mm long for the vertical straps that connect it to the chassis. Naturally, assembling something so tiny and fiddly is difficult! Eventually I realised that the vertical straps were best glued by sandwiching the thin footboard between thumb and finger, and then resting the free end of the vertical strap on my thumb!
Above: Attaching the 10mm long completed footboard assembly to the brake van chassis is also quite fiddly. In the end, the mechanical pencil was used to hold it in place whilst the glue grabbed, which fortunately wasn't long! Note that by this stage, the chassis has been painted Vallejo 'Dark Grey', the handles painted with the same, and the wooden strips either side of the red warning panels were painted brown along with the repaint of the interior.
Above: More details on the body itself are the inclusion of the windows - which in this case are simply offcuts of clear plastic packaging glued into place. Also added were simple benches, made from 0.040" plasticard, scribed to represent two individual planks. These were also a pain in the proverbial to install, as they had a propensity to fall over. I did mark dots to ensure they were aligned properly though.
Above: The roof is formed from a piece of 0.010" plasticard, and two edge strips of 0.030" underside. On top, 10mm wide strips of tissue paper are placed on top to represent roofing felt - each one slightly overlapping the previous one. A simple wash of Vallejo 'Black Grey' not only provides the colour, but also secures each piece in place and also helps secure the edges as they are wrapped around.
Above: Handrails are actually formed from left-over brass rod from the Greenwich Couplings which act as the pivot. These are bent, and then epoxied in place. Another fiddly job! Note the 009 track with the wheelsets on top - used to hold the handrail upright whilst the glue goes off.
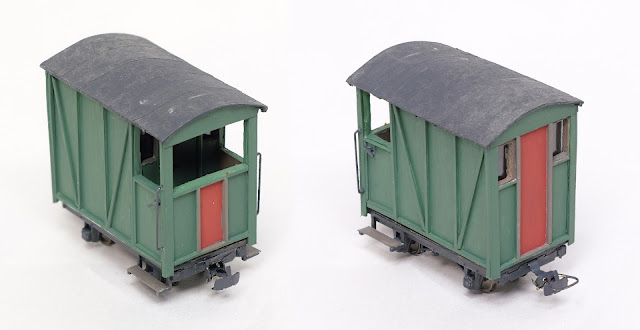
Above: And the finished* result! I'm pretty happy with the final results, and it's certainly been an eye-opener; if you had asked me beforehand if I would ever scratchbuild stock, my answer would've been "Probably not."! Truthfully though, as far as the bodywork goes, it's no real different from making a building as it uses the same construction techniques. Layering plasticard has certainly helped to add 'relief', though I'm sure further detailing could be done - such as a stove and stovepipe, some 'bolt' detail and perhaps some lettering/numbering on the sides. Though the latter is something I've never done. Maybe one day I will try it! For now though, I will call it a success, and although it's a little rough around the edges, I'm just pleased that I finished it. Now to give it a test run!
* minus weathering, which will probably only be a light mud colour around the chassis and bottom of the body
A final note: Sandy Shores is due to appear at the Model Railway Club's 'Mini Exhibition' at Keen House, 4 Calshot St, Kings Cross, London (N1 9DA) on December 10th - just a weeks time! I'd love to see some of you there. If it sways you, Graham Muspratt's Canute Road Quay will also be there. I'm immensely looking forward to it!
.JPG)
.JPG)
.JPG)
.jpg)
.jpg)
.jpg)
.jpg)
.jpg)
.JPG)
.jpg)
.jpg)
.jpg)
.jpg)
.jpg)

Comments
Post a Comment